
Migrate a K3S cluster storage from Rook to OpenEBS, with Velero
Category: kubernetes
Modified: Mon, 2023-Mar-06

Introduction
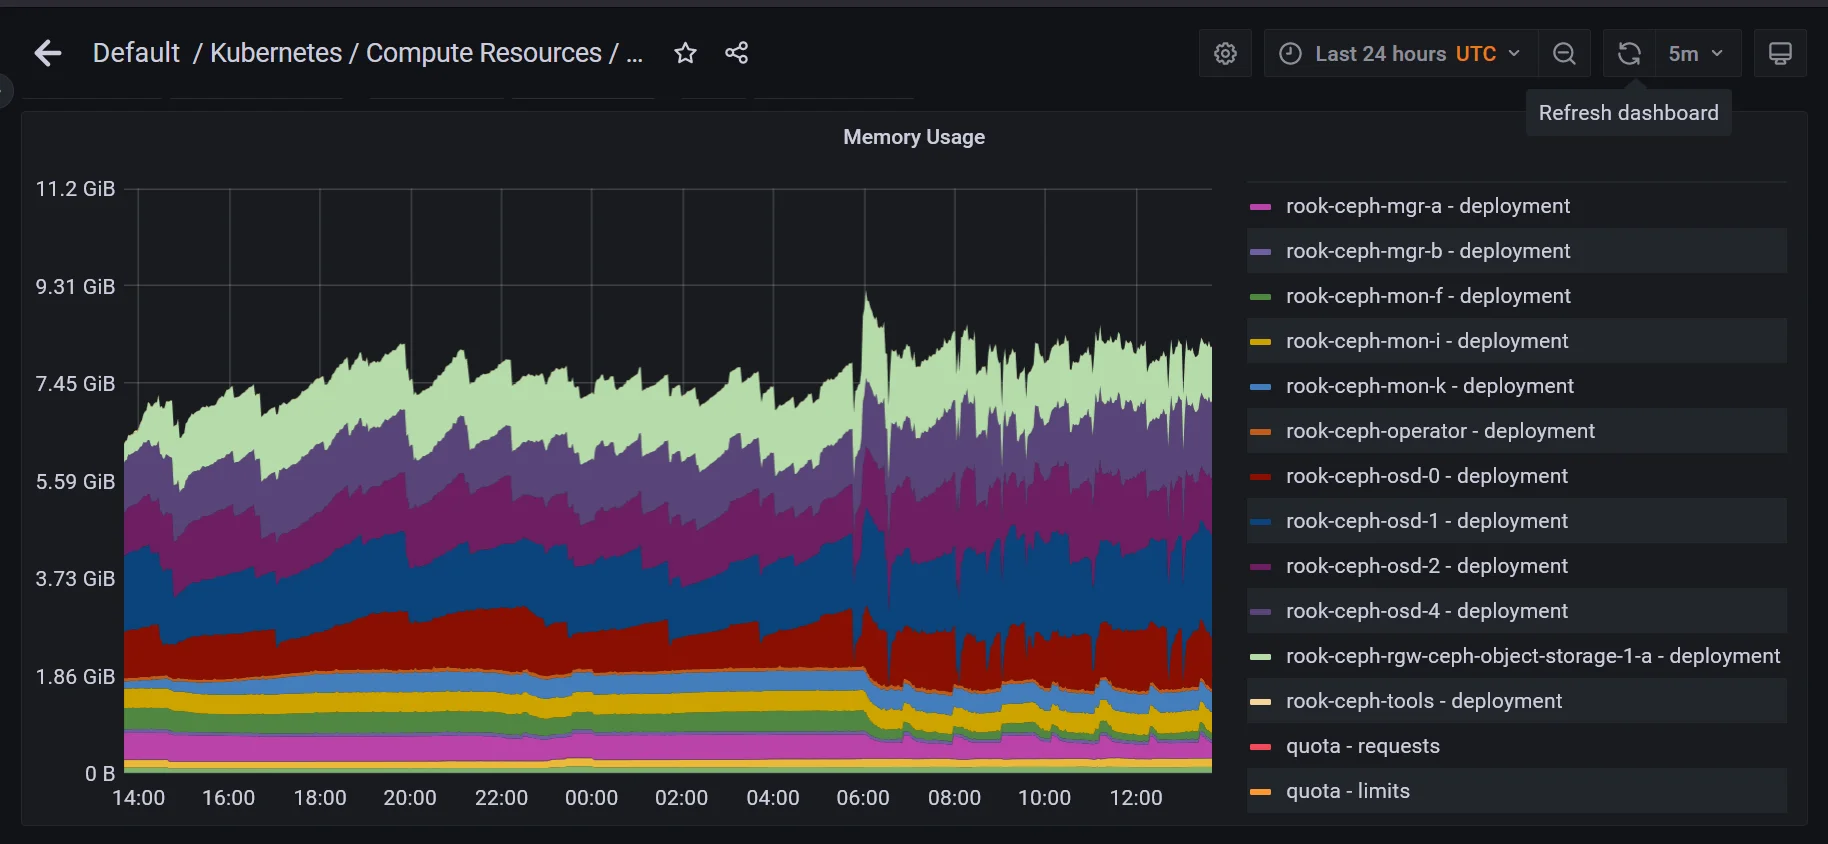
My K3S cluster is running on Oracle Cloud Infrastructure (OCI). I was using Rook as the storage for the K3S cluster. For the OCI free tier, you can run an ARM64 cluster with total of 24GB memory. Mine is a four node cluster, so each node has 6GB of memory. However, Rook (Ceph based) consumes quite a lot of memory from the system. Each OSD (Ceph Object Storage Daemon) consume about 1GB of memory. Then the Rook has two MGRs (Ceph Manager Daemon) and three Ceph Monitors. Total memory spend on Rook is about 8.5 GB.
Then I tried other CSI. Firstly, I tried Longhorn, but it seems it is not very stable on my ARM64 cluster. Then I tried Kadalu. However, I encountered an issue that was not fixed. Finally, I switched to use OpenEBS. But I do not have enough disk and memory to install both Rook and OpenEBS with the existing cluster. So I have to use Velero to backup my existing resources to an object storage. Then uninstall Rook, install OpenEBS and finally restore the data from the Velero backup.
Setup object storage
Since I am using the free tier of OCI, I do not have extra block disk storage to store my existing data. OCI free tier comes with 20GB of Oracle object storage. We can make use of it for storing backup.
-
In OCI, create a bucket, called object-storage-velero. In the bucket information, record the namespace. The S3 URL is https://your-s3-namespace.compat.objectstorage.oci-region.oraclecloud.com where 'oci-region' is 'ap-sydney-1' for me.
-
Next, we need to create access key and secret. In Identity, Users. I use my existing user for login OCI or you can create a new user. Then in that user, go to the 'Customer Secret Keys' section and create a secret key. The Access Key ID is same as Amazon S3 access key. The Secret is same as Amazon S3 secret. Record the access key and secret.
-
Next, we need to create a group in 'Identity'. I use the group name 'object-storage-velero'. Add the user in the previous step as member.
-
Finally, we need to create a policy. Go to 'Identity & Security', then go to 'Policies'. Create a policy with below rules:
Allow group object-storage-velero to read buckets in tenancy where target.bucket.name='object-storage-velero'
Allow group object-storage-velero to manage objects in tenancy where all {target.bucket.name='object-storage-velero', any {request.permission='OBJECT_READ', request.permission='OBJECT_INSPECT', request.permission='OBJECT_CREATE', request.permission='OBJECT_OVERWRITE', request.permission='OBJECT_DELETE'}}
Install Velero
Next, we need to install Velero to create backup. Velero is the de-facto open source backup application for Kubernetes. It can backup an entire or part of the Kubernetes resources. It can backup PVCs, secrets, CRDs, namespaces and etc. You can create scheduled backup with Velero.
For ARM64 platform and Velero, there is a problem if you want to use Helm chart for installation. The Helm chart wants to use the 'bitnami/kubectl' container image. That container image only supports AMD64 platform. So, I would use the Velero binary to install it on K3S. I installed version 1.10 because this version had started to integrate the Kopia storage plugin, which seems to use fewer system resources than the Restic storage plugin.
First, get the Velero CLI from GitHub. Next, create the s3-credential-oci file, it should be something like this:
[default]
aws_access_key_id = access-key-id
aws_secret_access_key = secret-credential
Next, install Velero, assume the current user have access to the control plane withe .kube/config We have mentioned the s3Url the previous section.
Edit: This is using the pod file backup, without snapshot volumes support.
        velero install \
  --provider aws \
  --bucket object-storage-velero \
  --plugins velero/velero-plugin-for-aws:v1.6.0 \
  --backup-location-config \
    s3Url=https://your-s3-namespace.compat.objectstorage.ap-sydney-1.oraclecloud.com,region=ap-sydney-1,s3ForcePathStyle="true" \
  --secret-file ./s3-credential-oci \
  --use-volume-snapshots=false \
  --use-node-agent
After installation is complete, you can check the status of the pods. There should be one pod created per node-agent (Daemon Set) and there should be one Velero controller pod (Deployment).
$ kubectl get pods -n velero
NAME                     READY   STATUS    RESTARTS       AGE
node-agent-89bgz         1/1     Running   2 (6d ago)     13d
node-agent-tjsw7         1/1     Running   3 (5d7h ago)   13d
node-agent-tn2nd         1/1     Running   3 (5d7h ago)   13d
velero-68f967c88-b9zcp   1/1     Running   3 (5d7h ago)   6d13h
node-agent-l8q6l         1/1     Running   4 (5d7h ago)   13d
If you want to use Kopia instead of Restic, edit the deployment of Velero. Edit the deployment to set upload-type as Kopia. Then restart the pod of velero .
              spec:
        containers:
        - args:
          - server
          - --features=
          - --uploader-type=kopia
Backup my data to the S3 bucket
Instead of create a backup that includes multiple namespaces, I created backups that is necessary. For my migration, I am re-using my existing nodes, so PVC is going to be destroyed but the existing config maps, secrets, ingresses and etc. is going to remain.
One important thing about Velero is that, by default it would not backup your PVC by default, you have to opt-in. In below example, I would like to backup the PostgreSQL (pgsql02 deployment).
Edit: It seems that it could use the '--default-volumes-to-fs-backup=true' switch when you run Velero cli instead of adding the volume name to the pod/deployment manually.
Firstly, we need to found out the volume name of the pod that store data. It’s vol-pgsql02-data01 in this example.
$ kubectl describe -n pgsql02 deployment/pgsql02
  Volumes:
   vol-pgsql02-data01:
    Type:       PersistentVolumeClaim (a reference to a PersistentVolumeClaim in the same namespace)
    ClaimName:  pvc-pgsql02
    ReadOnly:   false
Next, we need to edit the deployment to specify the volume name with an annotation. The name of the annotation is 'backup.velero.io/backup-volumes'. The content of the annotation is the volume name we obtained in the last step. The annotations should pass on to the pod. See below for an example.
        $ kubectl edit -n pgsql02 deployment/pgsql02

spec:
  template:
    metadata:
      annotations:
        # (get the volume name, not the pvc claim name)
        # use commas, for multiple volumes
        backup.velero.io/backup-volumes: vol-pgsql02-data01
After updating the deployment or statefulset, it may need to restart the pod to make it effective. Restart and check if the new pod has the annotation:
        $ kubectl describe pod -n pgsql02 pgsql02-647cf5b84c-lkz5n
Name:             pgsql02-647cf5b84c-lkz5n
Namespace:        pgsql02
Priority:         0
Service Account:  default
Node:             node07/10.15.0.165
Start Time:       Thu, 05 Jan 2023 14:24:04 +0000
Labels:           app=pgsql02
                  pod-template-hash=647cf5b84c
Annotations:      backup.velero.io/backup-volumes: vol-pgsql02-data01
                  kubectl.kubernetes.io/restartedAt: 2023-01-05T14:15:28Z
Status:           Running
Create a backup, but note the default TTL to keep a backup is 30 days. The TTL format used in Velero is 0h0m0s In below step, I set the TTL to 365 days.
        $ export NS=pgsql02
$ velero backup create backup-rook-${NS} \
  --include-namespaces ${NS} --default-volumes-to-fs-backup=true \
  --ttl=8760h --wait
Backup request "backup-rook-pgsql02" submitted successfully. Waiting for backup to complete. You may safely press ctrl-c to stop waiting - your backup will continue in the background. ................ Backup completed with status: Completed. You may check for more information using the commands `velero backup describe backup-rook-pgsql02` and `velero backup logs backup-rook-pgsql02`.
After backup, check the 'podvolumebackups' to see if the volume is backup by Velero:
$ kubectl -n velero get podvolumebackups -l velero.io/backup-name=backup-rook-pgsql02
NAME STATUS CREATED NAMESPACE POD VOLUME REPOSITORY ID UPLOADER TYPE STORAGE LOCATION AGE
backup-rook-pgsql02-rhhcf Completed 16d pgsql02 pgsql02-647cf5b84c-lkz5n vol-pgsql02-data01 s3:https://your-s3-namespace.compat.objectstorage.ap-sydney-1.oraclecloud.com/object-storage-velero/restic/pgsql02 kopia default 16d
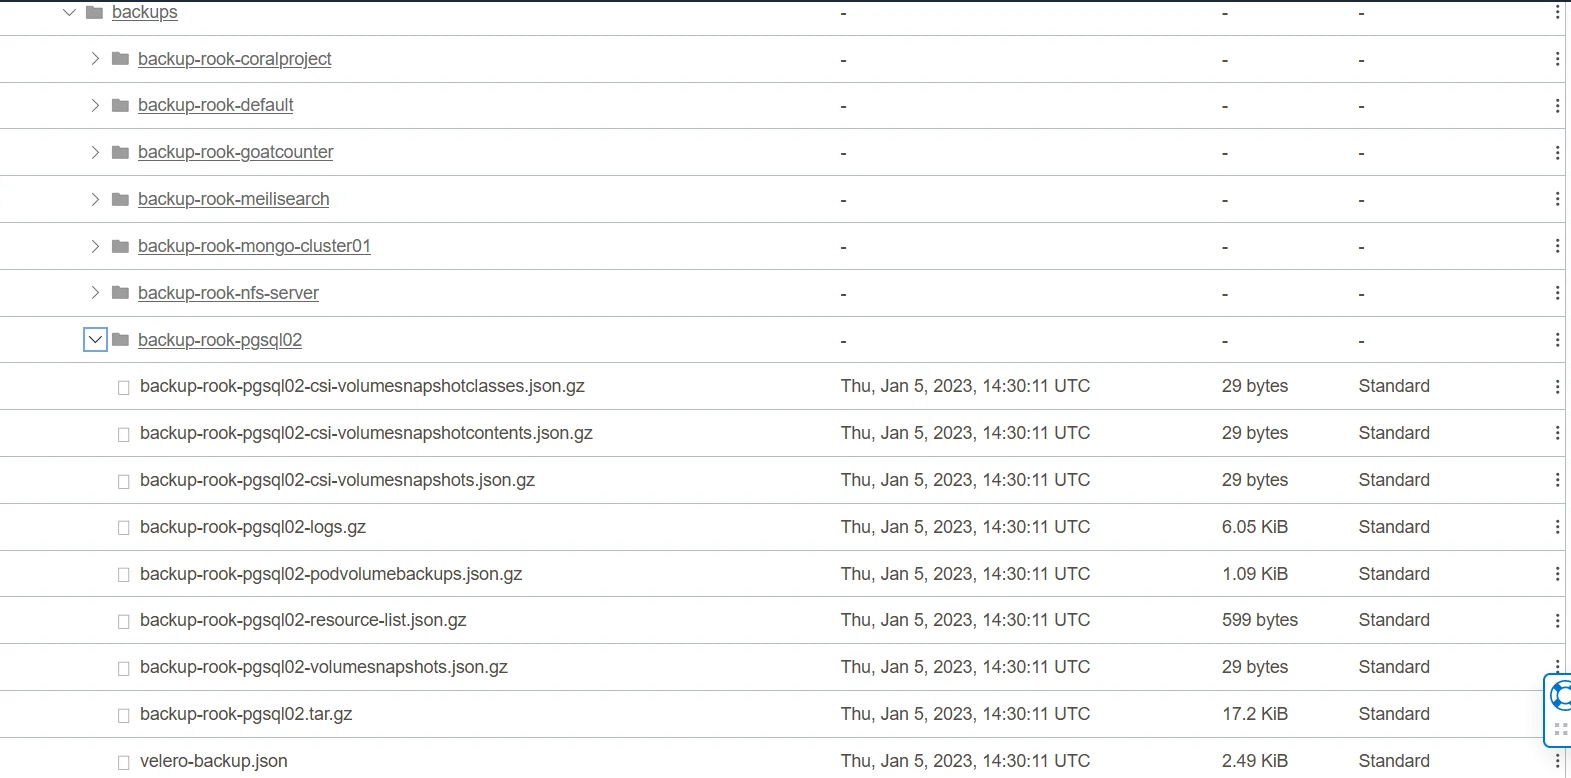
backup-rook-pgsql02-v497j Completed 16d pgsql02 pgsql02-647cf5b84c-lkz5n dshm s3:https://your-s3-namespace.compat.objectstorage.ap-sydney-1.oraclecloud.com/object-storage-velero/restic/pgsql02 kopia default 16d If you check the content of the S3 bucket, it should have a corresponding backup item related to the Velero backup jobs:
-
Repeat to backup everything I needed. Remember to opt-in for the pods to include all the volumes used in the pod
Remove Rook and install OpenEBS
I would suggest running Helm uninstall as last step. It is because there are some uninstall procedures that require the Ceph pods/controller. Refer to the official manual for details. After uninstalling Rook, it should also need to remove /var/lib/rook on all the nodes. And you should manually wipe out the existing partition information in the storage disks used by Rook (if any) before re-using it for other storage applications.
Next, I would be installing OpenEBS with Helm. The after installing the basic components of OpenEBS, we would install the cStor operator. We are going to use the cStor storage based on ZFS technology.
        $ helm repo add openebs https://openebs.github.io/charts
$ helm repo update

$ helm install openebs \
  --namespace openebs openebs/openebs \
  --create-namespace \
  --set analytics.enabled=false

$ helm repo add openebs-cstor https://openebs.github.io/cstor-operators

$ helm install \
  openebs-cstor openebs-cstor/cstor \
  -n openebs --set openebsNDM.enabled=false
Then run kubectl get bd -n openebs
NAME                                           NODENAME    SIZE          CLAIMSTATE   STATUS   AGE
blockdevice-82302ff5653e89e20f8aef42121a80ab   control01   25769803776   Claimed      Active   14d
blockdevice-b9b5a0c252d16ea277c1c86087cb0ac7   node02      25769803776   Claimed      Active   14d
blockdevice-44637cc3a9cfc1f03e0859cb006e2a35   node06      25769803776   Claimed      Active   14d
blockdevice-fb48abb585ab3bad2aba90f0975b8f5a   node07      25769803776   Claimed      Active   14d
Next step is to create a CSPC (CStorPoolCluster).
        ---
apiVersion: cstor.openebs.io/v1
kind: CStorPoolCluster
metadata:
  name: cstor-pool-cluster
  namespace: openebs
spec:
  pools:
    - nodeSelector:
        kubernetes.io/hostname: "control01"
      dataRaidGroups:
        - blockDevices:
            - blockDeviceName: "blockdevice-82302ff5653e89e20f8aef42121a80ab"
      poolConfig:
        dataRaidGroupType: "stripe"

    - nodeSelector:
        kubernetes.io/hostname: "node02"
      dataRaidGroups:
        - blockDevices:
            - blockDeviceName: "blockdevice-b9b5a0c252d16ea277c1c86087cb0ac7"
      poolConfig:
        dataRaidGroupType: "stripe"

    - nodeSelector:
        kubernetes.io/hostname: "node06"
      dataRaidGroups:
        - blockDevices:
            - blockDeviceName: "blockdevice-44637cc3a9cfc1f03e0859cb006e2a35"
      poolConfig:
        dataRaidGroupType: "stripe"

    - nodeSelector:
        kubernetes.io/hostname: "node07"
      dataRaidGroups:
        - blockDevices:
            - blockDeviceName: "blockdevice-fb48abb585ab3bad2aba90f0975b8f5a"
      poolConfig:
        dataRaidGroupType: "stripe"
If the CSPC creation is successful, you should see something like this :
        $ kubectl get cspc -n openebs

NAME                 HEALTHYINSTANCES   PROVISIONEDINSTANCES   DESIREDINSTANCES   AGE
cstor-pool-cluster   4                  4                      4                  108s
Finally, create the storage class. I suggest having replicaCount >2. If you use replicaCount = 2, and if the two nodes is down and up again. The cv (CStorVolume) could be down due to there are no majority of nodes (1 vs 1 or split brain situation). With replicaCount = 3, when they have at least two nodes and reach quorum, the remaining node would re-join the replica and the cv would rebuild and resume.
        ---
kind: StorageClass
apiVersion: storage.k8s.io/v1
metadata:
  name: cstor-pool2-r3
provisioner: cstor.csi.openebs.io
allowVolumeExpansion: true
parameters:
  cas-type: "cstor"
  replicaCount: "3"
  cstorPoolCluster: "cstor-pool-cluster"
  # default ext4
  #fsType: "xfs"
After the storage class is created, you can provision storage (PVC) on it. Here’s an example:
        apiVersion: v1
kind: PersistentVolumeClaim
metadata:
  annotations:
  labels:
  name: pvc-goatcounter
  namespace: goatcounter
spec:
  accessModes:
    - ReadWriteOnce
  resources:
    requests:
      storage: 250Mi
  storageClassName: cstor-pool2-r3
  volumeMode: Filesystem
Here’s the command if you want to have a check on the cv(CStorVolume)/cvr(CStorVolumeReplica) about the PVC:
$ kubectl get -n goatcounter pvc
NAME              STATUS   VOLUME                                     CAPACITY   ACCESS MODES   STORAGECLASS     AGE
pvc-goatcounter   Bound    pvc-436ce49b-4c31-4c39-b2aa-a793bb5901dc   250Mi      RWO            cstor-pool2-r3   15d

$ kubectl get -n openebs cvr | grep pvc-436ce
pvc-436ce49b-4c31-4c39-b2aa-a793bb5901dc-cstor-pool-cluster-247g   3.70M       14.2M   Healthy   15d
pvc-436ce49b-4c31-4c39-b2aa-a793bb5901dc-cstor-pool-cluster-kz6v   3.70M       14.2M   Healthy   15d
pvc-436ce49b-4c31-4c39-b2aa-a793bb5901dc-cstor-pool-cluster-47hw   3.70M       14.2M   Healthy   13d
Click here to view the output about describing the cv:
        $ kubectl describe -n openebs cv/pvc-436ce49b-4c31-4c39-b2aa-a793bb5901dc
Name:         pvc-436ce49b-4c31-4c39-b2aa-a793bb5901dc
Namespace:    openebs
Labels:       openebs.io/persistent-volume=pvc-436ce49b-4c31-4c39-b2aa-a793bb5901dc
              openebs.io/persistent-volume-claim=pvc-goatcounter
              openebs.io/version=3.3.0
Annotations:  <none>
API Version:  cstor.openebs.io/v1
Kind:         CStorVolume
Metadata:
  Creation Timestamp:  2023-01-07T06:32:50Z
  Generation:          43139
  Managed Fields:
    API Version:  cstor.openebs.io/v1
    Fields Type:  FieldsV1
    fieldsV1:
      f:metadata:
        f:labels:
          .:
          f:openebs.io/persistent-volume:
          f:openebs.io/persistent-volume-claim:
          f:openebs.io/version:
        f:ownerReferences:
          .:
          k:{"uid":"b9f2676a-16c2-4667-87d8-032295a619da"}:
      f:spec:
        .:
        f:capacity:
        f:consistencyFactor:
        f:desiredReplicationFactor:
        f:iqn:
        f:replicaDetails:
        f:targetIP:
        f:targetPort:
        f:targetPortal:
      f:status:
        .:
        f:replicaDetails:
      f:versionDetails:
        .:
        f:desired:
        f:status:
          .:
          f:current:
          f:dependentsUpgraded:
          f:lastUpdateTime:
    Manager:      cvc-operator
    Operation:    Update
    Time:         2023-01-08T11:01:30Z
    API Version:  cstor.openebs.io/v1
    Fields Type:  FieldsV1
    fieldsV1:
      f:spec:
        f:replicaDetails:
          f:knownReplicas:
            .:
            f:10432107083557140865:
            f:17597855822094308704:
            f:715212128761976505:
        f:replicationFactor:
      f:status:
        f:capacity:
        f:lastTransitionTime:
        f:lastUpdateTime:
        f:phase:
        f:replicaDetails:
          f:knownReplicas:
            .:
            f:10432107083557140865:
            f:17597855822094308704:
            f:715212128761976505:
        f:replicaStatuses:
    Manager:    volume-manager
    Operation:  Update
    Time:       2023-01-22T07:06:48Z
  Owner References:
    API Version:           cstor.openebs.io/v1
    Block Owner Deletion:  true
    Controller:            true
    Kind:                  CStorVolumeConfig
    Name:                  pvc-436ce49b-4c31-4c39-b2aa-a793bb5901dc
    UID:                   b9f2676a-16c2-4667-87d8-032295a619da
  Resource Version:        193061749
  UID:                     28830a49-d7b1-4918-8963-9676c5360491
Spec:
  Capacity:                    1Gi
  Consistency Factor:          2
  Desired Replication Factor:  3
  Iqn:                         iqn.2016-09.com.openebs.cstor:pvc-436ce49b-4c31-4c39-b2aa-a793bb5901dc
  Replica Details:
    Known Replicas:
      10432107083557140865:  5725189592215898465
      17597855822094308704:  4254904355646141860
      715212128761976505:    12904519857888241875
  Replication Factor:        3
  Target IP:                 10.43.133.12
  Target Port:               3260
  Target Portal:             10.43.133.12:3260
Status:
  Capacity:              1Gi
  Last Transition Time:  2023-01-16T12:08:22Z
  Last Update Time:      2023-01-22T07:06:48Z
  Phase:                 Healthy
  Replica Details:
    Known Replicas:
      10432107083557140865:  5725189592215898465
      17597855822094308704:  4254904355646141860
      715212128761976505:    12904519857888241875
  Replica Statuses:
    Checkpointed IO Seq:  3150638
    Inflight Read:        0
    Inflight Sync:        0
    Inflight Write:       0
    Mode:                 Healthy
    Quorum:               1
    Replica Id:           5725189592215898465
    Up Time:              500351
    Checkpointed IO Seq:  3150381
    Inflight Read:        0
    Inflight Sync:        0
    Inflight Write:       0
    Mode:                 Healthy
    Quorum:               1
    Replica Id:           12904519857888241875
    Up Time:              500347
    Checkpointed IO Seq:  3150638
    Inflight Read:        0
    Inflight Sync:        0
    Inflight Write:       0
    Mode:                 Healthy
    Quorum:               1
    Replica Id:           4254904355646141860
    Up Time:              500290
Version Details:
  Desired:  3.3.0
  Status:
    Current:              3.3.0
    Dependents Upgraded:  true
    Last Update Time:     <nil>
Events:                   <none>
Restoring my resources from the S3 bucket
Since we do not have the storage class for Rook anymore, we have to map the storage class to OpenEBS cStor. Refer to the Velero manual. Here’s my example, mapping the old storage class (rook-ceph-block) to the new storage class (cstor-pool2-r3):
        ---
apiVersion: v1
kind: ConfigMap
metadata:
  # any name can be used; Velero uses the labels (below)
  # to identify it rather than the name
  name: change-storage-class-config
  # must be in the velero namespace
  namespace: velero
  # the below labels should be used verbatim in your
  # ConfigMap.
  labels:
    # this value-less label identifies the ConfigMap as
    # config for a plugin (i.e. the built-in restore item action plugin)
    velero.io/plugin-config: ""
    # this label identifies the name and kind of plugin
    # that this ConfigMap is for.
    velero.io/change-storage-class: RestoreItemAction
data:
  # add 1+ key-value pairs here, where the key is the old
  # storage class name and the value is the new storage
  # class name.
  rook-ceph-block: cstor-pool2-r3
Since my K3S cluster is not fully removed, I just need to remove the deployments, stateful sets, pods, PVCs and PVs. Then I can restore the resource from S3 bucket, the PVC restored would be using the mapped storage class.
Here’s an example for restoring Goat Counter:
        $ kubectl delete -f 04-deployment-sqlite.yaml
deployment.apps "goatcounter" deleted

$ kubectl get pvc -n goatcounter
NAME              STATUS   VOLUME                                     CAPACITY   ACCESS MODES   STORAGECLASS      AGE
pvc-goatcounter   Bound    pvc-c075046f-05c6-416f-a0c8-a78679e7c54a   250Mi      RWO            rook-ceph-block   37d

$ kubectl delete -n goatcounter pvc/pvc-goatcounter
persistentvolumeclaim "pvc-goatcounter" deleted

$ velero restore \
  create restore-rook-goatcounter \
  --from-backup backup-rook-goatcounter --restore-volumes=true

Restore request "restore-rook-goatcounter" submitted successfully.
Run `velero restore describe restore-rook-goatcounter` or `velero restore logs restore-rook-goatcounter` for more details.

$ velero restore describe restore-rook-goatcounter

Name:         restore-rook-goatcounter
Namespace:    velero
Labels:       <none>
Annotations:  <none>

Phase:                       Completed
Total items to be restored:  67
Items restored:              67

Started:    2023-01-07 06:32:40 +0000 GMT
Completed:  2023-01-07 06:32:54 +0000 GMT

Warnings:
  Velero:     <none>
  Cluster:  could not restore, CustomResourceDefinition "certificaterequests.cert-manager.io" already exists. Warning: the in-cluster version is different than the backed-up version.
            could not restore, CustomResourceDefinition "certificates.cert-manager.io" already exists. Warning: the in-cluster version is different than the backed-up version.
            could not restore, CustomResourceDefinition "ciliumendpoints.cilium.io" already exists. Warning: the in-cluster version is different than the backed-up version.
            could not restore, CustomResourceDefinition "ingressroutes.traefik.containo.us" already exists. Warning: the in-cluster version is different than the backed-up version.
            could not restore, CustomResourceDefinition "middlewares.traefik.containo.us" already exists. Warning: the in-cluster version is different than the backed-up version.
            could not restore, CustomResourceDefinition "orders.acme.cert-manager.io" already exists. Warning: the in-cluster version is different than the backed-up version.
  Namespaces:
    goatcounter:  could not restore, ReplicaSet "goatcounter-cbc8dcc7" already exists. Warning: the in-cluster version is different than the backed-up version.
                  could not restore, Deployment "goatcounter" already exists. Warning: the in-cluster version is different than the backed-up version.
                  could not restore, Endpoints "goatcounter" already exists. Warning: the in-cluster version is different than the backed-up version.
                  could not restore, EndpointSlice "goatcounter-ckknr" already exists. Warning: the in-cluster version is different than the backed-up version.
                  could not restore, Service "goatcounter" already exists. Warning: the in-cluster version is different than the backed-up version.

Backup:  backup-rook-goatcounter

Namespaces:
  Included:  all namespaces found in the backup
  Excluded:  <none>

Resources:
  Included:        *
  Excluded:        nodes, events, events.events.k8s.io, backups.velero.io, restores.velero.io, resticrepositories.velero.io, csinodes.storage.k8s.io, volumeattachments.storage.k8s.io, backuprepositories.velero.io
  Cluster-scoped:  auto

Namespace mappings:  <none>

Label selector:  <none>

Restore PVs:  true

Existing Resource Policy:   <none>

Preserve Service NodePorts:  auto
Checking the status:
        $ kubectl get all -n goatcounter
NAME                             READY   STATUS    RESTARTS   AGE
pod/goatcounter-cbc8dcc7-rppks   1/1     Running   0          3m7s

NAME                  TYPE        CLUSTER-IP      EXTERNAL-IP   PORT(S)    AGE
service/goatcounter   ClusterIP   10.43.144.214   <none>        8080/TCP   393d

NAME                          READY   UP-TO-DATE   AVAILABLE   AGE
deployment.apps/goatcounter   1/1     1            1           3m5s

NAME                                     DESIRED   CURRENT   READY   AGE
replicaset.apps/goatcounter-cd5b9f64b    0         0         0       3m7s
replicaset.apps/goatcounter-cbc8dcc7     1         1         1       3m7s

$ kubectl get pvc -n goatcounter
NAME              STATUS   VOLUME                                     CAPACITY   ACCESS MODES   STORAGECLASS     AGE
pvc-goatcounter   Bound    pvc-436ce49b-4c31-4c39-b2aa-a793bb5901dc   250Mi      RWO            cstor-pool2-r3   2m46s
Repeat the same steps for other namespaces. Finally, after migrating to OpenEBS, the memory usage reduced to around bewteen 4.7GB to 5.5GB.

Comments
No. of comments: 0
Please read and agree the privacy policy before using the comment system.